Tuesday, October 26, 2010

Touch of Sunshine on a Grey Day

Shop Updates

"Touch of Sunshine on a Grey Day" - Sweater Purse
I've been busy, busy, busy... with creating and stockpiling things for my first upcoming boutique! But I have to share a few of my favorite new things for my blogger/etsy friends first.
Here are a few new additions to the shop.

Leather Flower & Pearl details - beautiful yellow/white vintage lining
 Available - HERE

Grey Cozy Throw Pillows 
Available: HERE

Nautical Sweater Pillows - Navy Blue Stripe & Sweater
with Gold nautical buttons of an Anchor and Rope.
Available: HERE

So much fun what can be made from a single sweater!

It's finally getting cold enough to wear a sweater here in AZ, I've been enjoying having my windows open 24/7! I still get a slight panic attack when its so cold in the house, thinking I must have cranked down the A/C and forgotten to turn it off... ahhh, thank goodness for no more huge electric bills this year!

Get Cozy!!  =)

Friday, October 22, 2010

Boyfriend Bag and Nature Lovers Purse


This purse/bag started off as a navy blue cozy mens knit sweater and chunky leather belt.
Something about turning menswear into womens accessories I love... the rough edginess to something so soft and pretty!


The strap and buckle were made from refashioning a well broken in mens leather belt.
I love the weight and feel to it, the buckle is fully fuctioning and helps hold your belongings safe inside along with a magnetic clasp!

On a side note, I was so excited to find this vintage amazing apple crate at a yard sale a few weeks ago.
It has been added to my collection in my craft room! :)
~ Details ~

Leafy Nature Lovers Purse

This purse is made from new materials - (I know I cheated! ;) But I found the material on sale and I adore the brown linen and used leather scraps to make the beautiful green leaves with lots of stiching details.

The Boyfriend Bag and others are available in my etsy shop!


~ Heather ~

Monday, October 18, 2010

DIY Twinkle Toes

Twinkle Toes - Upcycle Style!

I went shoe shopping this weekend with my 5 year old daughter, she most definetely inherited my love for shoes! You should have seen her face when she saw a pair of Twinkle Toes shoes on the rack.... pretty much my same reaction to a pair of amazing leather strappy heels on sale!

 Stars in her eyes... nothing else matters but these shoes, need to have, must have... will most possibly die without them. ;)

I've seen these shoes on TV before but hadn't really thought much about them. They are super girly sparkly over the top, but little girls LOVE them. I was informed by my daughter, that "EVERYONE at school has a pair of twinkle toes", and "I am the only one without them".... "I love them mommy.... please please please!"

I almost folded until I checked out the price tag, $42!!! Wait a minute, are you freaking kidding me?? $42 for kids shoes that will be grown out of in approx 3 months from now?

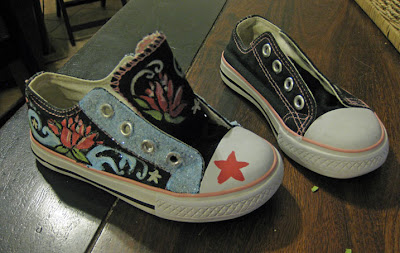
So began our journey of DIY Twinkle Toes Shoes, here is my simple tutorial. Sorry the pics aren't the greatest, I had a slave driver watching over my shoulder.... lol... She was MORE than excited to try them on! :)

Lucky for me I had just picked up these canvas pink/black shoes at a garage sale last weekend for $1, but you could find something similar in at a thrift shop, sale bin, walmart... etc..

Pretty little blank canvas' waiting to be bedazzled! 
Next we got online and I let her pick out her favorite pair of Twinkle Toes on Sketches website.
 I gathered my supplies: Fabric Paint, Puffy black paint for details, glitter, fabric safe glue, and jewels for loads of sparkle!

Thankfully I already had ALL these items in my craft room, so this project only cost me $1! -- Thats a savings of $41 bucks!  --- Do you think that savings justifies me being able to buy myself a pair of new shoes??? ;)
 Tip:  Be sure to stuff your shoe with something to keep it firm... I learned this half way through the project. Painting is much easier on a firm canvas rather than floppy one.  I painted one shoe first to give myself a template for the 2nd one.  
In progress! I painted the laces area blue, let dry, then added fabric glue and lots of glitter! 
** Now for the sparkly fun! - Bedazzling! ** 
 I used glue backed jewels and the sauter iron, but had hard time getting them to stay put on the rubber.
I ended up regluing a few them using superglue which worked much better!
Finished Product! 
One VERY happy little girl, and one mommy with a happy wallet!  ;)


Friday, October 15, 2010

Smiles of my Week

Well I didn't accomplish much sewing this week, with the kids home from fall break... and sick germies sharing their love between the 3 kids, and myself... But, I did have plenty to be thankful for!
Here are a few moments that made me Smile!
Nap time didn't come easy when Bella's big brother & sis were home this week. She played till she dropped! It finally got quiet in the house, and I found my baby girl curled up on the dog bed with her big sisters favorite stuffed doggie!  So precious....


The next was totally RANDOM. If you know my son, you know is 100% a pizza, pasta, burger loving kinda guy. So my jaw dropped when he requested spinach SALAD for dinner.... haha.. probably a once in a lifetime request... but hey, I was happy to serve up his order! I can't even get his daddy to eat this stuff.... go Buddy!


Next my husbands parents from Oregon spent the weekend with us and we all LOVED having them here.
It makes me smile how much my hubby loves his family!
Here is a pic of my adorable mother-in law and handsome hubby. :)


Next smile is my magical wardrobe....  I'm not gonna lie, I definetely did a happy dance when I brought this beauty home. It has been in my family for over 100+ years, an antique passed down through several generations I believe.

It has so many childhood memories associated with it, I was so fascinated by it growing up. Now my children get share in the memories! My parents were cleaning out a spare room where it has been stored for years, and lovingly passed it on to me because they knew the joy it would bring me! It has no fur coats or alternate worlds that I'm aware of... but you never know..... ;)


It is HUGE tall, and I love the details and charcacter of it! I think it always reminded me of the wardrobe from Beauty & the Beast that sings in Bell's Room. So for now it will store all the creations that I make to sell in my etsy LuvARoo shop. :)

And lastly, there is a thunderstorm rolling in right now! If you know me, you'll know rain & thunder makes me SMILE! I'm off to make dinner & watch the storm with my lil family!
What made you SMILE this week?

Thursday, October 14, 2010

Ripping out the pages

 Book Pages Upcycling?
Don't worry I'm not ripping up any amazing documentaries...  I used dollar store bargain books for my projects!  No classics I'm sure.... ;)

I got this idea from JoyFrameworks, who shared her Pages Wreath. Well, I fell in love with this idea and had to create my own too. Here is my spin on it and also some other clever book page decorating ideas I found in Blogland.

Book Page Wreaths
Aren't they pretty? I love that all the texture yet they give the wall!

They are super easy to make, I bought all the supplies at the dollar store:
* A plain wreath any size or kind you like (you wont see it anyway as it is going to be covered in pages!)
* Books- I bought two, one a cheesy romance novel. (and the other was called Pot Shot. LOL... Who would know these pretty wreaths are actually made from books about pot & sex!! hahaha... Shhh... Our secret!) ;)

--- NOTE: I would LOVE to see this created out of sheet MUSIC pages!
Wouldn't that be so pretty too!?
 I don't have any tutorial pics for you but It's pretty easy you get the idea. First you paint or stain the edges of your book, let dry then..... Just Rip, Roll, and Glue!
I used hot glue and have plenty of blisters today to prove it. However I did find another tutorial with a clever idea of using a hanger...No gluing, very clever! See it here at Corner Crafts.

I really like the idea of keeping these wreaths plain and adding to them for the holiday seasons.
So I created this smaller Autumn leaves wreath that fits perfectly in the center of the large paper wreath.
These large colorful leaves were from the dollar store also!
I glued these around an old embroidery hoop, very simple & lightweight!
Best part is I already had the hoop, and the leaves only cost me a $1.
Place it in the center of the large wreath... and now I've added a little Autumn Colors!
I can't decide if I love it there though, I might use my Fall leaves wreath somewhere else. What do you think? Is it to bold a contrast in the center?

Here are a couple other clever ideas from other artists I really enjoyed!
  
The book page leaves wreath from Alisa Burke
She handpainted autumn leaves with watercolors onto her pages.. this is so pretty & colorful!
If you enjoy painting this is a great project, it might also be a fun variation for kids!
Have them paint fall leaves onto pages to create something for their door.
She also used an old embroirdery hoop! :)
I made some leaves like this with my extra pages and stuck them on the fridge. They might make an awesome garland though.

Childrens Book Wreath
Okay how Dr. Seuss is this guy!? So fun & quirky!
Not sure I'm loving the glasses... but there are endless fun ideas for the center.
See more on this Childrens book turned into a bedroom decoration from: It's Gravy, Baby!

Paper Flowers made from Books
There is a great tutorial from It's in the Details blog that goes with this lovely flower.
Check it out: HERE

Pumpkin or Apple Books!
Another little addition at the suggestion of a friend!
Pumpkin or Apple book decorations... adorable!
Learn how to make your own at Cheeky Magpie's tutorial.

Enjoy! And get crafting.... repurposing those books you never use anymore.
Looking at these lovely decorations in your home might just inspire you to read!

Wednesday, October 13, 2010

Sweater Pillow Shop Update - NEW!

SHOP Update!
Sweater Throw Pillows - Lots of Cozy goodness! :)

Reversible Throw Pillows - Use these cuties 4 ways!
Just flip the bow to the opposite side to create a new look or use back side up!
What do you think of this design? It kind of came to me by accident... but I'm thinking I really like it! Change it up without having to totally switch pillows. I can think of endless fabric combos... :)
Available: HERE 

Chocolate & Yellow Roses = Lazy Saturday Morning
$15 - Available 
Sweater Pillow SET - 2 Tan Cozy Winter Throw Pillows
 Available - 2 for $20! 
 
These are positively addicting, look how cozy they are! Lucky for you I made these to share! :)
Want to make your own?  -- Each of these sweater pillows are made from an upcycled knit sweater with new stuffing & lining. See more info on thrifty decorating here!  

Here is a little preview of my next project! oohhh... and I've been ripping up books! 
Gaaasp!......See why soon!  ;) 

Tuesday, October 5, 2010

Hexagon Table Makeover

Hexagon Table Makeover!
$5 - Drab to Fab - Remember how I found this guy at a yard sale last weekend?
BEFORE:
Boring right? Well, I had fun plans for this funky table!
I love the detail on the front of this cabinet table, but it looks overall dated... I love the hidden storage too!
We needed a coffee table, and wanted something that would fit right in our living room that is arranged at an angle, hence one of the reasons I chose this table with all the angles!
 I also wanted a fun pop of soft color, so here is the AFTER! :) 

I love the way it adds a splash of color without being to overwhelming. I'm pretty happy with the outcome!

I had so much fun working with the glaze on this project, giving it that aged beauty. 
First I sanded it down and removed the hardware
It's a messy dirty job but somebodies gotta do it! ;)
I chose this soft teal blue color from the designs in our rug, they look so pretty together!  
I used a dark esspresso colored glaze, that stuff is so much fun to work with! It makes everything look more glamourous... how boring would this piece be if it was just a solid color?
Next we spray painted the knob with a metalic oil rubbed bronze to give it new life! I may be a little obsessed with this stuff... we also painted the gold old handles on our entertainment center this color too. 
That stuff saved me a bunch of $$, rather than buying new knobs just because I hated the color... we simply changed them. And it is super durable too!

Family approved! ;)
Trash to treasure...this was a fun project! I'm sure you'll be seeing more soon....